 LampOff
User guide
1 · Getting started: your first plot in 5 steps
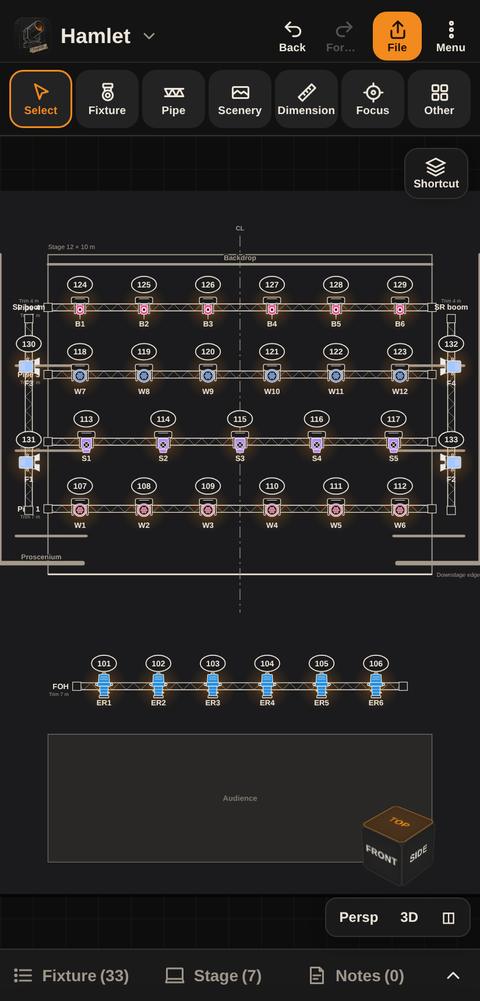
- Start a project. Tap the project name at the top › My projects › New project. On the Info tab enter the show, venue, designer and stage width / depth.
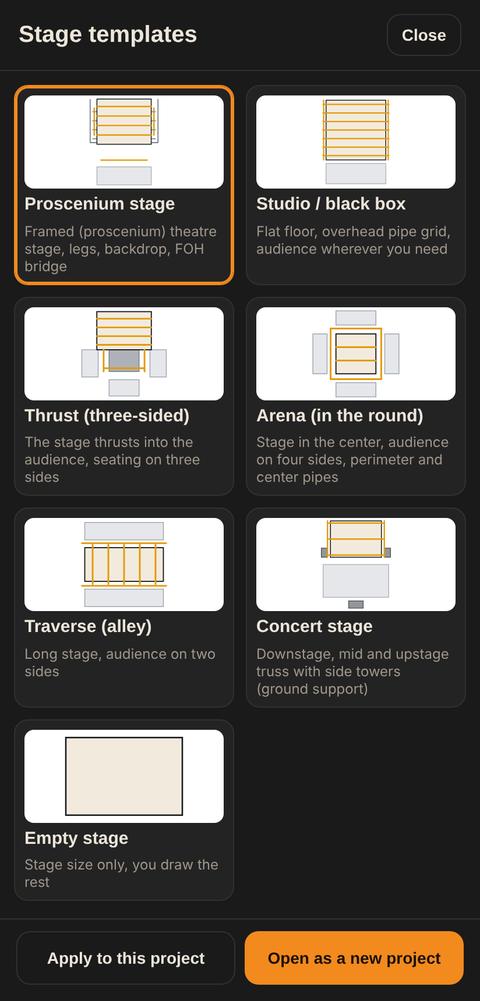
- Build the stage. For a quick start pick a template from ⋮ › Stage templates (proscenium, black box, arena…): pipes, legs and backdrop are scaled to your size. Or draw pipes one by one with the Pipe button.
- Place fixtures. Tap Fixture in the toolbar, pick a type (e.g. Moving Wash) and tap a pipe. Fixtures dropped near a pipe snap onto it and never overlap.
- Number and patch. Give unit numbers W1, W2… from the properties or by tapping fixtures in order with Numbering; enter console channels and DMX addresses.
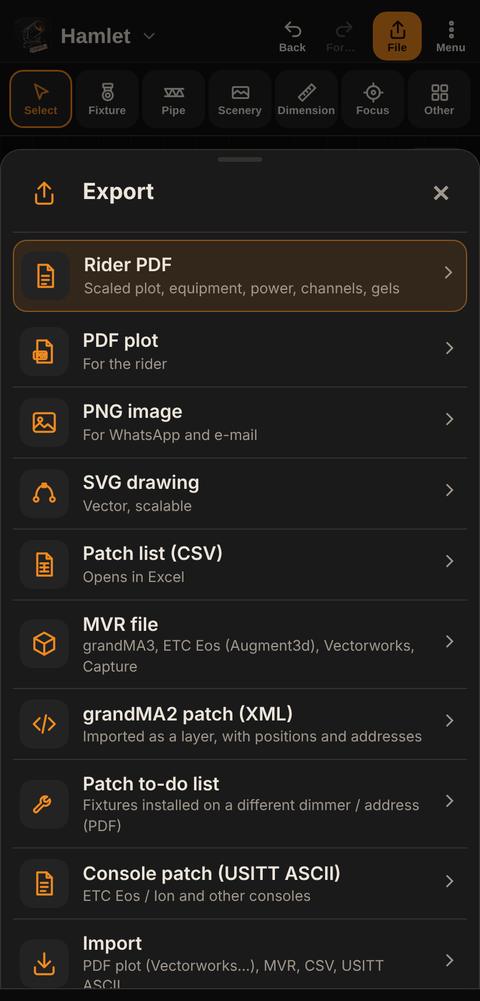
- Export. Orange Export button › Rider PDF: scaled plot, equipment list, power total, patch list and gel list in one file.
2 · Screen layout: bars, cube and bottom panel
On a phone the screen has four parts:
- Top bar: logo and project name (tap for Projects), Undo, Redo, orange Export and the ⋮ menu (Search, Patch list, Library, Stage templates, Projects, My layout, Layout, Edit toolbar, Settings, Help).
- Toolbar: Select, Fixture, Pipe, Scenery, Measure, Focus and Other. Other opens a grid from the bottom: Multi-select, Pan, Text, Lock, Unlock, View, Number, Beams, Library, Patch, Stage templates, Search. The active tool has a thin orange outline; tap again to turn it off.
- Drawing area: the Shortcut button top right (Shortcuts and Layers as two tabs), the view cube bottom right. On a phone you zoom with two fingers; the − / + box can be turned on in ⋮ › Layout. Floating buttons fade while you pan so the plot stays visible.
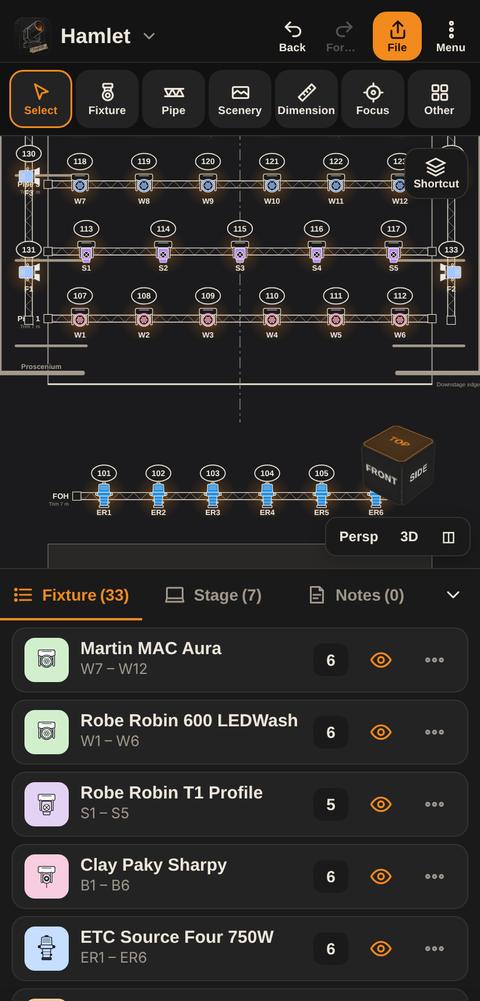
- Bottom panel: the Fixtures tab groups by model (unit range like W1–W6, count, eye to hide, ⋯ for properties); Stage lists the stage and pipes; Notes lists texts. Swipe up on the tabs to open, down to close. The panel lists what is in the project; adding always goes through the toolbar or Shortcuts.
Notices appear briefly at the top; undoable actions such as delete carry an Undo button. Zoomed out, the plot shows only channel numbers; zooming in adds unit number, address and gel. When a fixture is selected the others dim.
3 · Navigating, selecting and multi-select
Phone and tablet- Two fingers: pan and zoom. ⤢ in the zoom box fits the plot to the screen.
- Tap: select. Tap empty space: deselect.
- Drag with one finger on empty space: select everything in the area.
- With Multi-select on, everything you tap is added to the selection.
- With Pan (hand) on, one finger moves the plot and nothing gets moved by accident.
- Press and hold: menu (section 10). With a selection, the menu applies to all selected items.
- Wheel: zoom. Right or middle drag: pan. Drag on empty space: area select.
- Shift/Ctrl + click: add / remove. Double-click: properties. Right-click: menu.
When something is selected the selection bar appears at the bottom: Properties, Pipe (selects the pipe the fixture hangs on), Duplicate, Focus, Delete and ⋯ More (Copy, Rotate, Lock / Unlock, Add to shortcuts, All properties).
4 · Projects, venues and stage templates
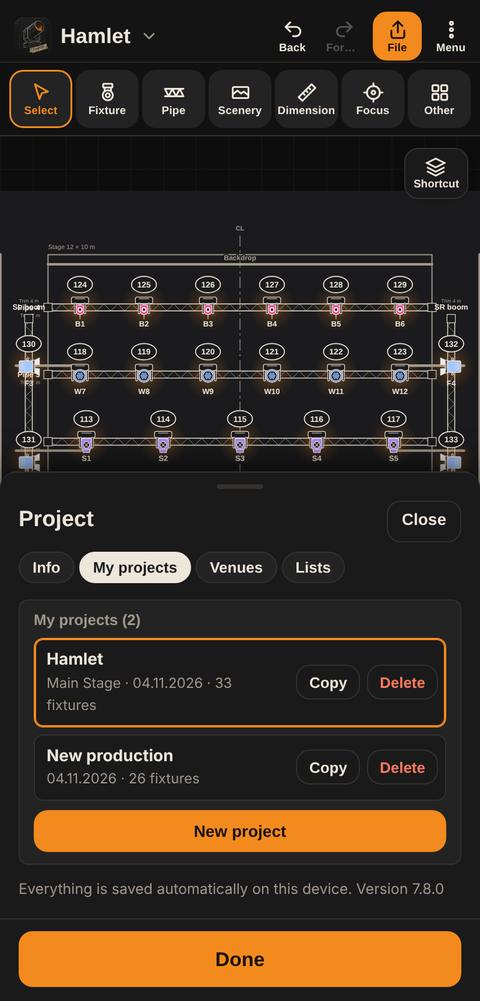
- Each show is its own project. Tap the project name › My projects: open, copy, delete.
- Venues: save a theatre you tour to (stage, pipes, scenery and optionally a house rig). Tap it to start a new project with that venue ready. Venues can be shared as files.
- Stage templates (⋮ menu): proscenium, studio / black box, thrust, arena, traverse, concert, empty. Enter the sizes; pipes, legs and backdrop are built to scale. Apply to this project or Open as new project.
5 · Stage, pipes and booms
- Pipe tool: drag from start to end on the plot. More tools › Stage has Pipe, Boom / side pipe, Upright tower and Pipe array (count and spacing in one go).
- Drag a pipe to move it; its fixtures travel with it.
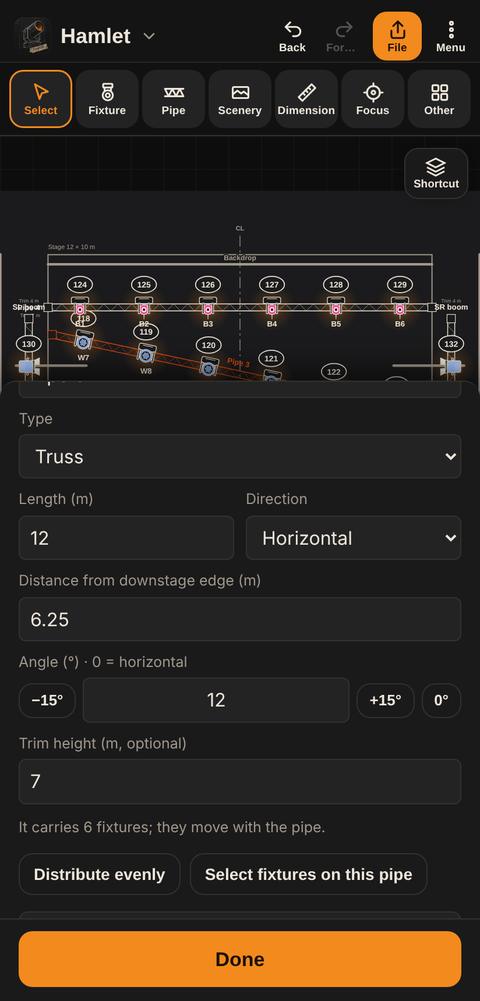
- Tap the pipe › Settings: name, length, direction, distance from the stage edge, angle and height (trim).
- Angle: turn the pipe to any angle (−15° / +15° buttons or type a value). Its fixtures rotate with it and stay attached.
- Type: in pipe settings choose Truss or Pipe; on an upright tower choose Truss tower or Boom. The plot, front/side views and 3D are drawn to match.
- Boom (floor stand): on the Stage tab; an upright pipe on a floor base. Side lights hang on a boom or upright tower. A fixture not hung anywhere appears on a floor stand in 3D.
- Press and hold a pipe: Add fixtures › (add, fill with N fixtures, paste), Fixtures on it › (spread evenly, select, select one type), Pipe › (copy with fixtures, split here, height, set angle), Lock, Delete.
6 · Upright towers and heights (x, y, z)
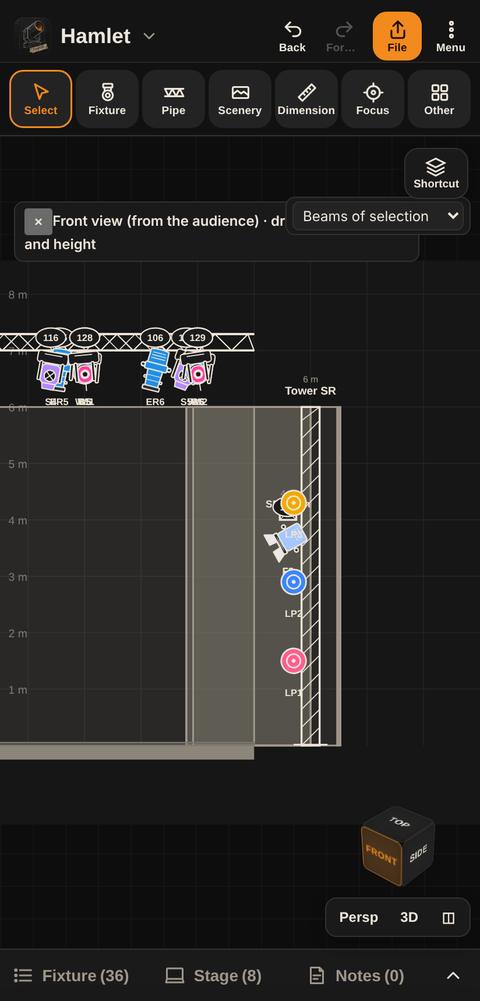
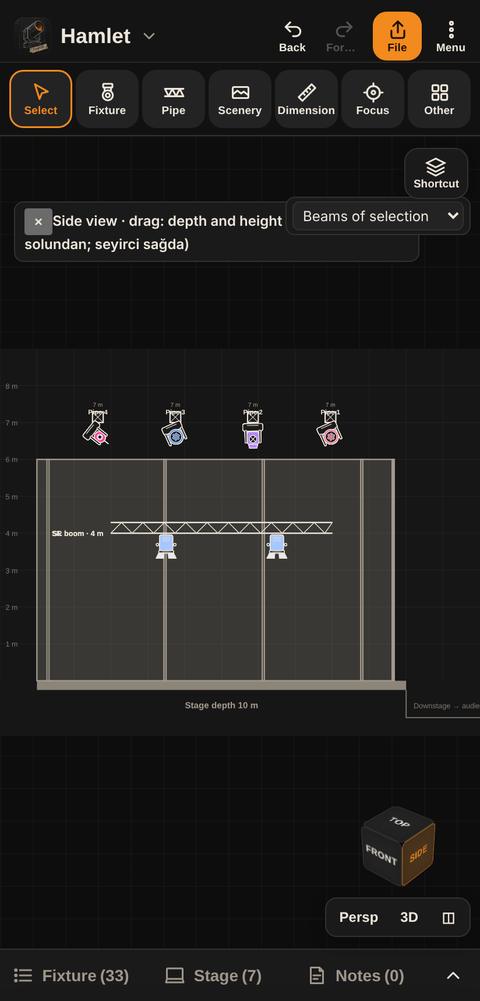
The plot is the view from above (x: left-right, y: depth). Height (z) is edited in the front and side views, which work just like the plot:
- Drag a pipe up or down: its height (trim) changes. Drag it sideways: x changes in the front view, depth in the side view. Its fixtures travel with it.
- Fixtures can be dragged along their pipe. Dragging a fixture that is not on a pipe (on the floor, a stand or an upright tower) up or down changes its height.
- Zoom with the wheel or two fingers, pan with one finger on empty space, double-tap to fit. Double-tap an object to open its properties.
Upright tower: a truss tower standing up from the floor. It shows as a small square (☒) on the plot, at full height in the front and side views and upright in 3D.
- More tools › Stage › Upright tower. It is added beside the stage; drag it into place on the plot.
- In the tower settings enter the Height and tap Hang fixtures on tower…: count, lowest height, spacing and fixture.
- Switch to the front view and drag the fixtures up or down to their exact heights.
7 · Adding fixtures and the fixture library
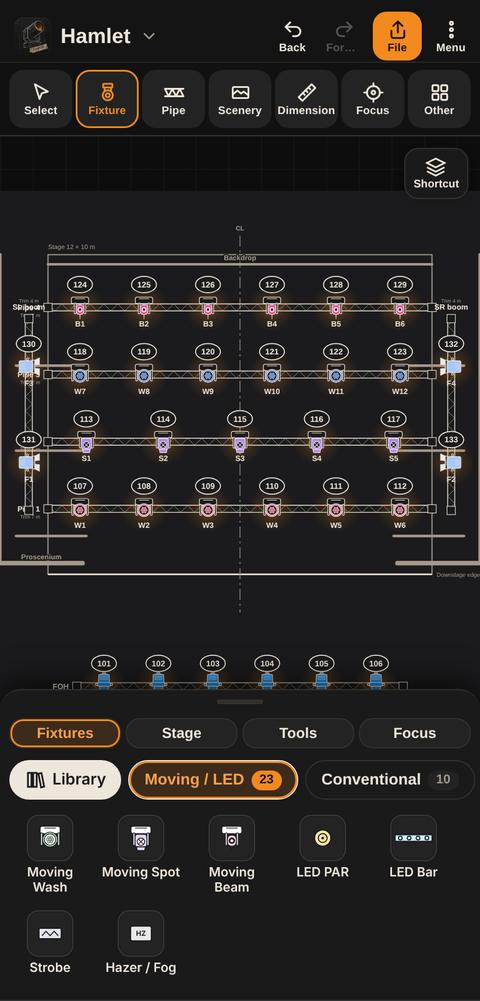
- Fixture button: groups (Moving / LED, Conventional, Other, Custom symbols). Pick a type and tap the plot or a pipe; keep tapping to place more. Go back to Select when done.
- Fixtures seat on pipes, upright towers and booms. On a full pipe the fixture still seats and a “tight pipe” warning appears; Distribute evenly spaces them out.
- Adding in front / side view: pick a fixture in the palette and tap a tower or pipe in the view; the fixture hangs at the height you tapped.
- Shortcuts: the Shortcut button top right; Layers is the second tab in the same window. Keep frequently used fixtures and pipes here; use Add to shortcuts in a fixture’s or pipe’s properties. Tap a shortcut, then tap its place on the plot. In My layout the shortcut and layer buttons can also go into boxes.
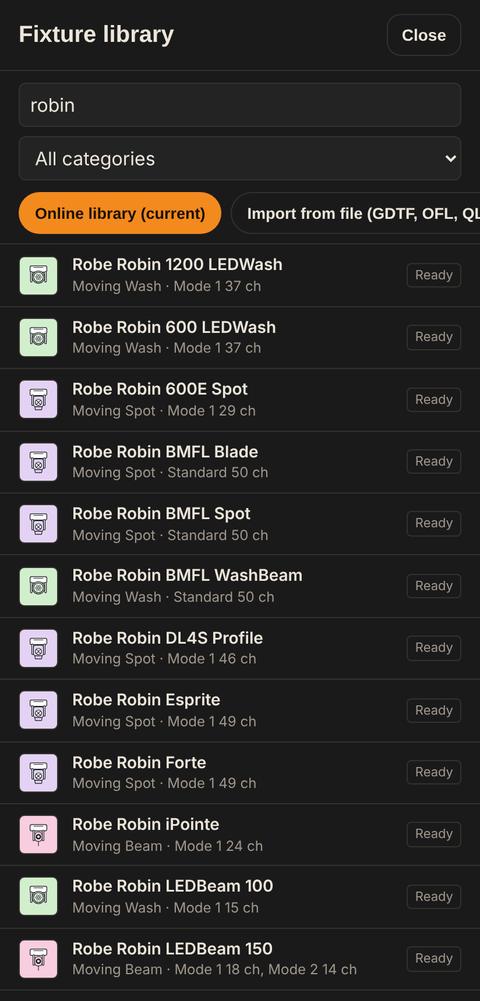
- Fixture library (⋮ › Library or the Library button on the sheet): thousands of real fixtures, offline. Search brand / model and tap Place. Fixtures come with modes, channel maps, power, weight and real dimensions.
- Import GDTF, Open Fixture Library (.json) and QLC+ (.qxf) files into the library. For anything missing use Custom symbols › New symbol.
- Fill a pipe: press and hold the pipe › Add fixtures › Fill pipe… › count and fixture; they are spaced evenly.
8 · Fixture properties
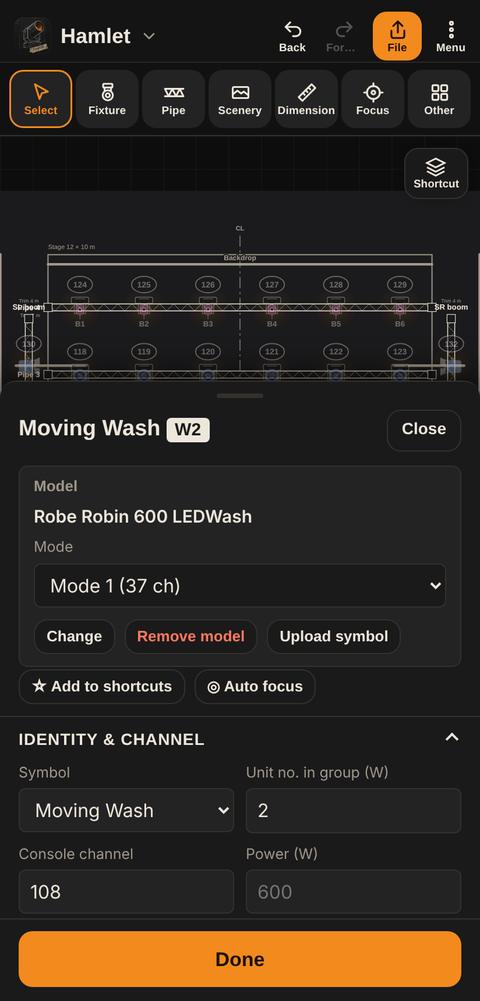
Tap a fixture and press Edit in the selection bar (or press and hold › Properties). With several fixtures selected the change applies to all.
- Model and mode: assign a library model and choose its mode; channel count and channel map come with it.
- Identity and channel: symbol type, unit number (W3), console channel, power.
- DMX: universe and address; dimmer number for conventionals.
- Gel (Lee / Rosco code), gobo, symbol color, note.
- Height (m): for fixtures not on a pipe.
- Beam: select a fixture to see its beam; drag the orange dot to focus it.
After typing a value tap Done at the bottom: the value is saved and the sheet closes.
9 · Numbering, console channels and addressing
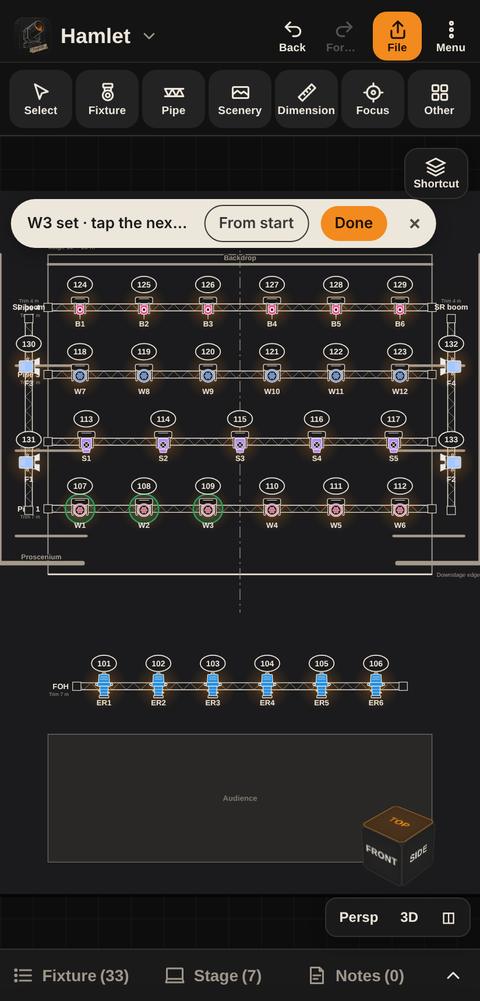
- Each type is numbered on its own: W1, W2… S1, S2…
- Numbering (More tools, or add it to the toolbar): tap fixtures in any order. Restart resets the counter, Done ends it.
- Number the selection: press and hold › Quick settings › Number… (front to back, left to right).
- Changing a unit number by hand swaps it with the fixture that had that number; numbers never clash.
- Set console channel… and Set DMX address… (Quick settings) give the selection consecutive values; addresses step by each fixture’s channel count.
- Auto patch in the patch list puts unaddressed DMX fixtures on free addresses (section 15).
10 · Editing and the press-and-hold / right-click menu
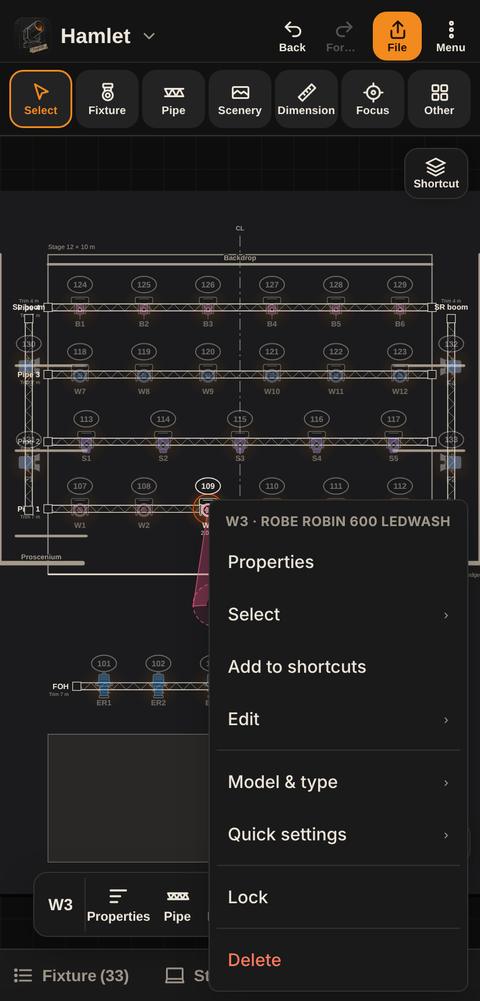
Right-click on a computer, press and hold on a phone. The menu is grouped:
- Fixture: Properties · Edit › (copy, duplicate, paste, rotate 90°, mirror, align and distribute, hide) · Model & type › · Quick settings › (channel, DMX, gel, changed patch, gobo, note, number) · Select › (same type, same model, on this pipe) · Lock · Delete.
- Pipe: Settings · Add fixtures › · Fixtures on it › · Pipe › · Lock · Delete ›.
- Empty space: Add › (fixture, pipe, boom, text, scenery, paste) · Tools › (measure, focus, repeat) · View › · Layers › · Selection ›.
- Mirror copies the selection to the other side of the centre line.
- Repeat (the . key on a computer) repeats the last action where the cursor is.
- Made a mistake? Undo at the top.
11 · Locking
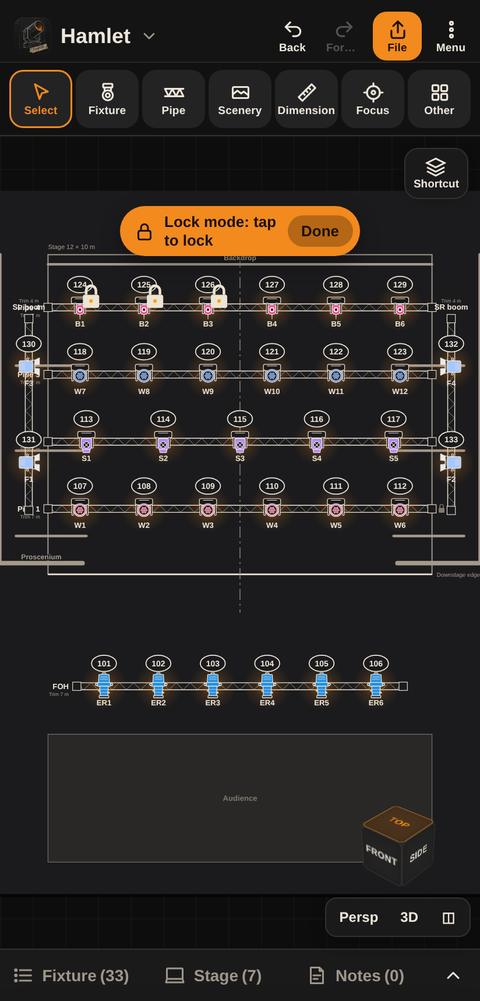
- Tap Lock once: the button stays on and a “Lock mode” bar appears at the top. Every fixture, pipe, scenery piece, text and dimension you tap is locked; no need to press the button each time.
- Unlock works the same way: while it is on, tapping a locked object unlocks it.
- Tap the button again or Done on the bar to leave the mode.
- Anything selected before the mode starts is locked immediately.
- A locked fixture stays in place but can still be selected, edited, lit and focused. Locked objects show a small lock icon.
- To unlock everything: press and hold empty space › Selection › Unlock all.
12 · Scenery, legs, performers and objects
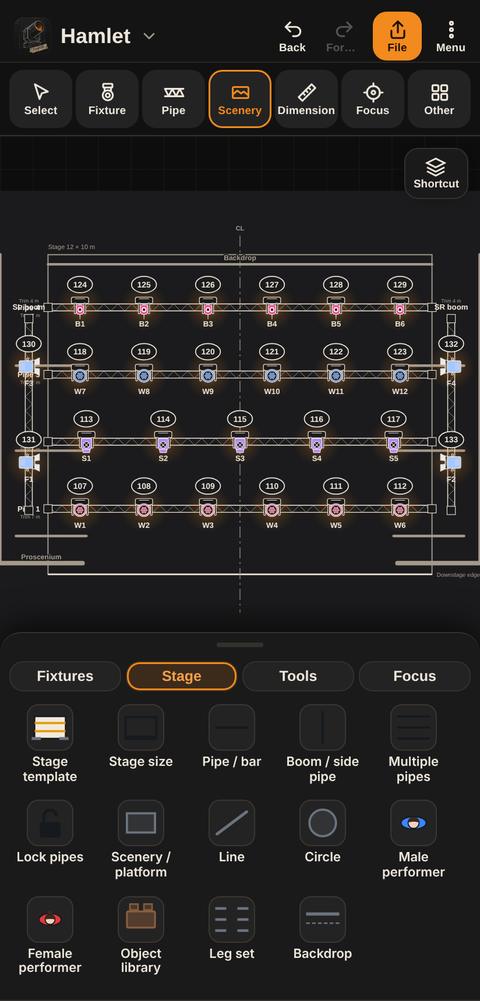
- Scenery / platform: drag corner to corner. Circle: centre to edge. Line: drape, wall.
- Leg set: evenly spaced legs left and right, optionally with backdrop and borders.
- Male / female performer: placed where you tap; type a name and turn them with the orange dot.
- Object library: table, chair, armchair, bed, piano, door, rostrum, stairs… Objects appear at their real height in the front, side, perspective and 3D views.
- Your own object: draw the parts, give each a height and height above floor, select all › Save to object library.
- Every piece can have a label, color, line width, dashes, fill and height.
13 · Dimensions, cable runs and text
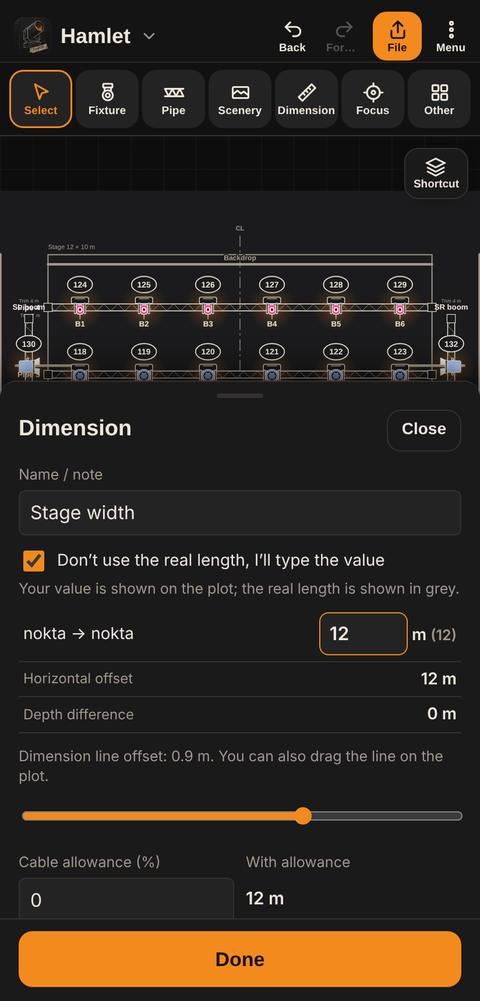
- Measure tool: tap two points or two fixtures (or drag from one to the other); the distance is written. Drag the dimension line to offset it.
- Chain: draw a cable run point by point; total length and cable allowance (%) are calculated.
- Manual value: if part of the plot is drawn not to scale so it fits, select the dimension › check “Don’t use the real length, I’ll type the value” › type the length for each segment. Your value shows on the plot and in PDFs; uncheck to go back to the real length.
- A dimension whose ends are attached to fixtures updates when the fixture moves.
- Text tool: places a text where you tap; edit it in the panel, resize with the corner handle.
14 · Views: cube, front, side, perspective and 3D
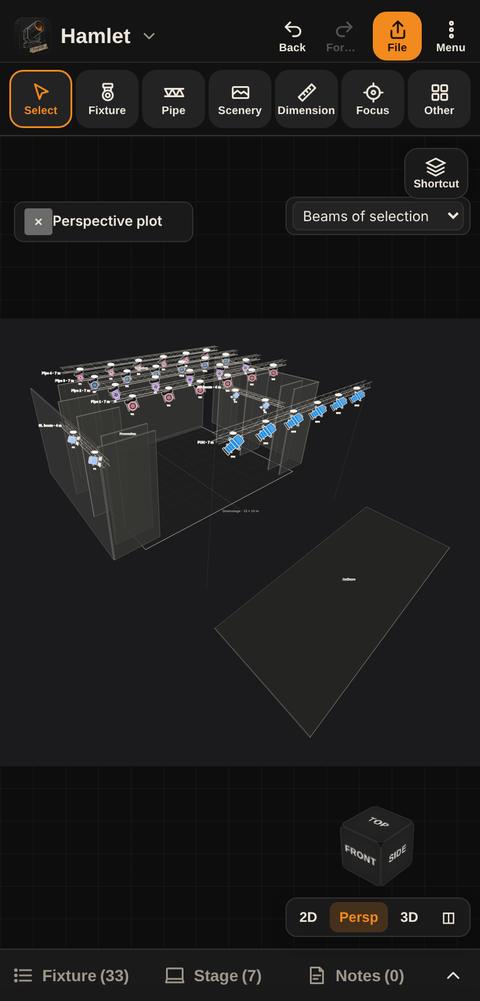
The view cube bottom right shows which way you are looking. Drag the cube to rotate it and tap a face to switch: TOP = plot, FRONT = from the audience, SIDE = from the side. Under the cube: Persp (perspective drawing), 3D (live 3D) and ◫ (split screen). A double tap resets the cube.
- Front / side: fixtures appear with their plot symbols, aimed at their focus. Drag to change position and height as in section 6; pick a fixture in the palette and tap a tower or pipe to add lights from here too.
- Perspective: pipes are drawn as box truss and fixtures with their plot symbols. Drag empty space to rotate; drag a fixture or pipe to move it, double tap for its properties. Pick a fixture in the palette and tap a pipe or tower to add it. The cube faces give preset angles.
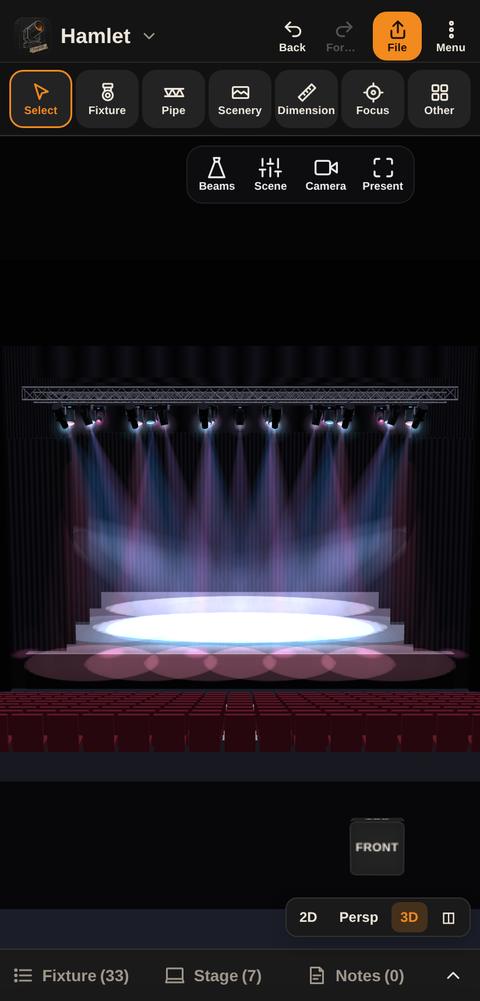
- 3D: drag to orbit, two fingers to pan and zoom. Directions come from the viewpoints in the Camera menu; the cube is not shown in 3D. The 2D button at the bottom returns to the plot.
- The Control button opens a small Pan / Tilt joystick; press again to close it. Push the joystick and the selected fixtures turn that way, stopping when you let go; pan covers 540° (−270…270) and tilt 270° (−135…135), so a fixture can aim at the backdrop, the ceiling or scenery. Fine is for small moves and ⟲ points the fixture straight down again.
- Selected fixture: an orange focus target marks its focus point. Press ◎ Gather in the joystick panel and tap a point in 3D (stage, curtain or scenery): all selected fixtures aim there and pan and tilt are calculated for you. With one fixture selected the Focus page card at the bottom shows the target, angles and note; on a phone it starts as a thin strip (S1 · Pan · Tilt) and expands on tap. Pan/Tilt labels can be turned on in the Scene panel.
- Camera button: viewpoints (House centre, From stage to house, Diagonal, Top, Left and Right side), Save this view for your own viewpoints, orthographic camera and Save image (high resolution). Double-tap an object to fly the camera to it.
- Scene panel: House light (Dark, Show, Work and a fine slider), Haze density, Stage floor (wood, black marley, grey), legs and borders, cyclorama, house, shadows and Image quality (Fast / Quality). Add performer figure puts a 1.75 m figure on stage; drag it in 3D to see the light and shadow on a face.
- Present: hides every control for a clean full-screen view; save an image or exit from the top right. If pipe heights are missing a ⚠ appears in the bar; tap it for the explanation.
- ◫ Split screen: edit the plot at the top while 3D or the front view updates live below.
15 · Patch list
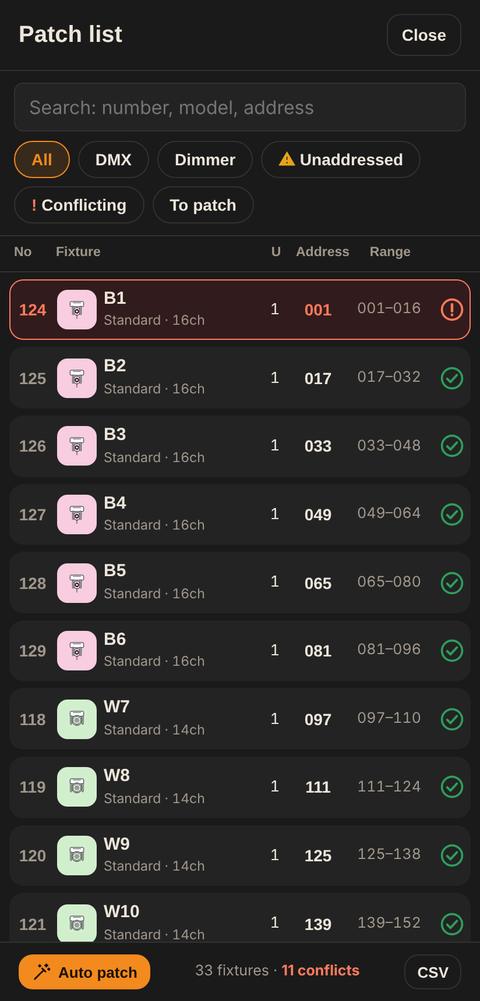
⋮ › Patch list. Each row is a fixture: console channel, icon, unit and mode, universe, address, address range and status.
- Status: green ✓ fine · red ! address conflict · yellow ⚠ no address.
- Filters at the top: All, DMX, Dimmer, Unaddressed, Conflicting, To patch. The search box looks in units, models and addresses.
- Tap a row to edit channel, universe and address in place; Done closes it, Show on plot finds it on the plot.
- Below the list: universe usage (e.g. 36 / 512) and Address conflict, Unaddressed and To patch cards; tap a card to open that list.
- Auto patch puts unaddressed DMX fixtures on free addresses in order. CSV exports the list for Excel.
16 · Focus mode (focusing on stage)
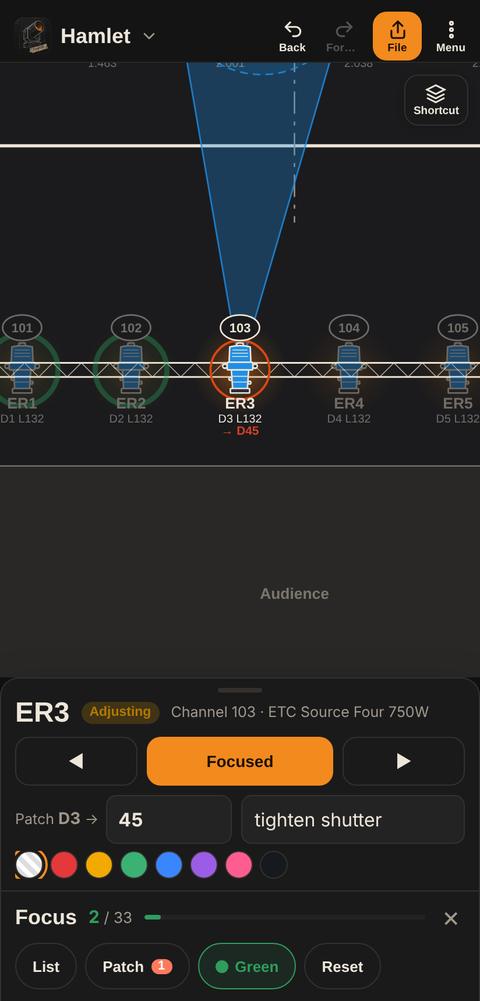
- Tap Focus in the toolbar. The focus bar opens at the bottom and stays until you leave focus mode: how many are focused (e.g. 2 / 33), Start / Next, List, Patch, Green, Reset.
- Tap a fixture (or Start): the focus box opens above the bar. ◀ ▶ moves to the next fixture and the plot zooms to it.
- Tap Focused: the fixture is marked green on the plot. Tapped by mistake? Tap again to undo.
- Patch → Changed: if it was plugged into a different dimmer or address on site, type it; the plot shows a red “→ D45”. Note: a focus note like “tighten shutters”. Color dots mark the symbol.
- Tap empty space to close the box; the bar stays. × on the bar leaves focus mode.
- List: the focus page with focused fixtures and changed patches together, exportable as PDF.
- Auto focus: select fixtures › Focus on the bottom bar (or long-press › Auto focus) › tap the plot once; all selected fixtures aim at that point.
- Patch: the re-patch list (hung differently on site). These notes are temporary; the plot and console data stay as they are. Clear them after the show.
17 · Export: Rider PDF and other outputs
- Sightlines: with Sightlines on in the side view, borders and the eye lines of row 1 (blue) and the last row (pink) are drawn. A pipe the audience can see gets a ⚠ mark. Row distances, eye heights and border trim are set in Project › Info › House and sightlines; a border is placed just downstage of each pipe, and 3D uses the same values.
- Revisions and comparison: Save this state in Project › Info stores the current plot as a revision. Compare or Compare with a file… (a .json from your assistant) lists differences in position, channel, address, gel, gobo, focus and pipes; Select changes on the plot selects them all.
- MVR (Vectorworks, grandMA3, Capture): focus points (FocusPoint), gel colour, gobo, channel (FixtureID), unit number, dimmer address and tower heights travel both ways; Vectorworks’ nested groups and layers open in the right place, and upright towers and booms are rebuilt as towers.
- Professional paperwork: Instrument schedule (position, unit, fixture, purpose, channel, address, gel, gobo / accessories, throw, beam diameter), Magic sheet (one row per position, channels laid out as on stage, colour = gel) and Pipe dimensions and loads (approximate kg and power per pipe, total hung load). The Revision from the project info is printed at the foot of every page.
- Photometrics: the fixture panel and the 3D focus card show throw distance, beam diameter at focus (Ø) and approximate centre lux. Luminous flux comes from the GDTF profile; otherwise a type average is used and marked with *. The fixture panel has Weight (kg) and Accessories (barn doors, top hat, iris…); the pipe panel shows the load and power on that pipe.
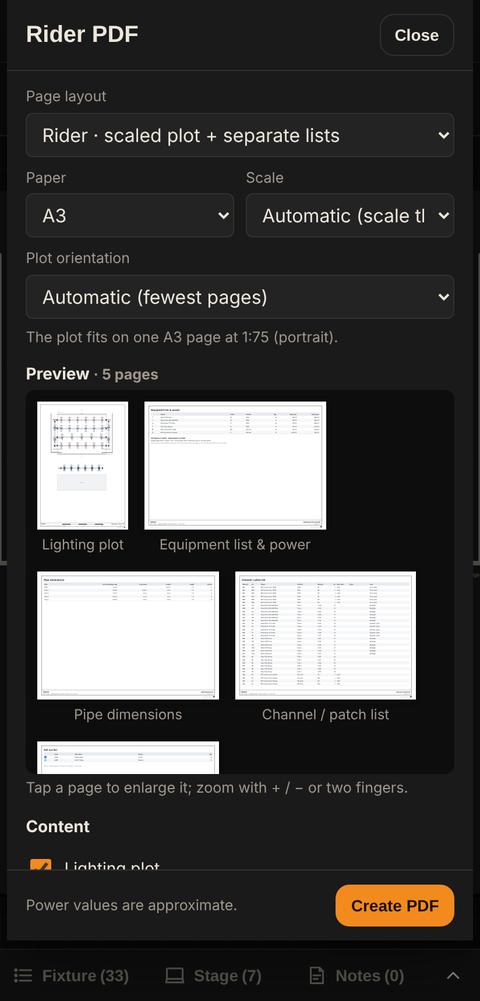
- Rider PDF: scaled plot (best scale chosen automatically), equipment list, total power and amps per phase, pipe dimensions, channel / patch list, gel cut list, notes; optionally front, side and perspective pages. Page layout: separate lists or a single sheet (plot + symbols).
- Tap a page in the preview to open it full screen; zoom up to 800% with + / −, two fingers or a double tap, and move between pages with ◀ ▶.
- PDF plot, PNG image (WhatsApp / e-mail), SVG drawing (vector).
- Patch list (CSV), MVR file (grandMA3, ETC Eos Augment3d, Vectorworks, Capture), grandMA2 patch (XML), Console patch (USITT ASCII), Patch to-do list (PDF).
- Save project (.json): a backup or to continue on another device; restore with Open project.
- On a phone, Download or Share appears when the file is ready.
18 · Importing
Export › Import:
- PDF plot: the PDF of a lighting plot drawn in another program. The symbol list is read, symbols are recognised by color and size, pipes and notes are extracted. Choose the page and area first, then check the matches.
- MVR: opens as a new project or adds to yours; pipes are created from fixture positions and any GDTF files go into your library.
- CSV (from a console, Lightwright or Excel): bulk-updates channels, addresses, dimmers and gels or adds new fixtures.
- USITT ASCII: updates addresses by console channel.
- Project (.json) and venue files.
19 · Layout settings and My layout
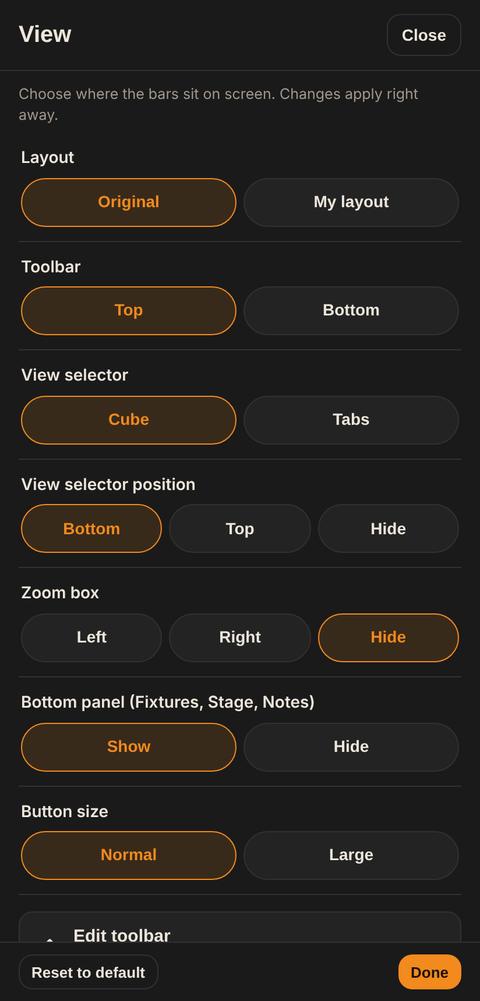
⋮ › Layout. Changes apply right away; Reset to default restores the original.
- Toolbar: top or bottom. View selector: cube or tabs; position bottom, top or hidden. Zoom box: left, right, hidden. Bottom panel: show / hide. Button size: normal / large.
- Edit toolbar: which buttons appear and in what order (✓ to add / remove, arrows to reorder).
My layout: your own working screen. The original screen stays as it is; switch between them from the ⋮ menu.
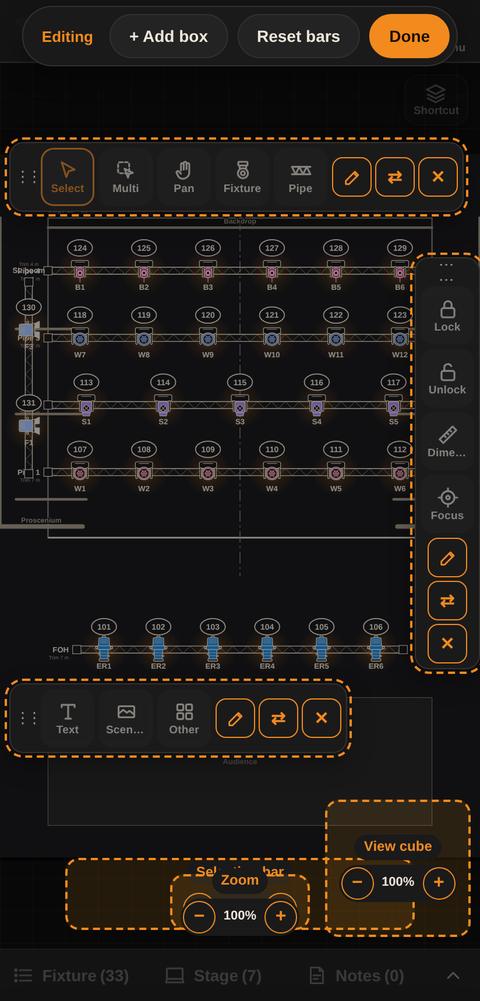
- When it is on, the top toolbar goes away and floating boxes appear over the plot.
- The Edit button bottom left starts editing; the plot and tools stay locked meanwhile. Drag boxes from anywhere; each box gets ✎ (which buttons go inside), ⇄ (horizontal / vertical), ✕ (delete); + Add box, Reset bars and Done at the top.
- While editing, the selection bar, zoom and view cube also show as dashed frames; drag them to place them and use − / + to resize them. The Shortcuts and Layers buttons can go into boxes.
- Sheets, menus and palettes open above the boxes, which hide while they are open.
20 · Layers: hide and lock
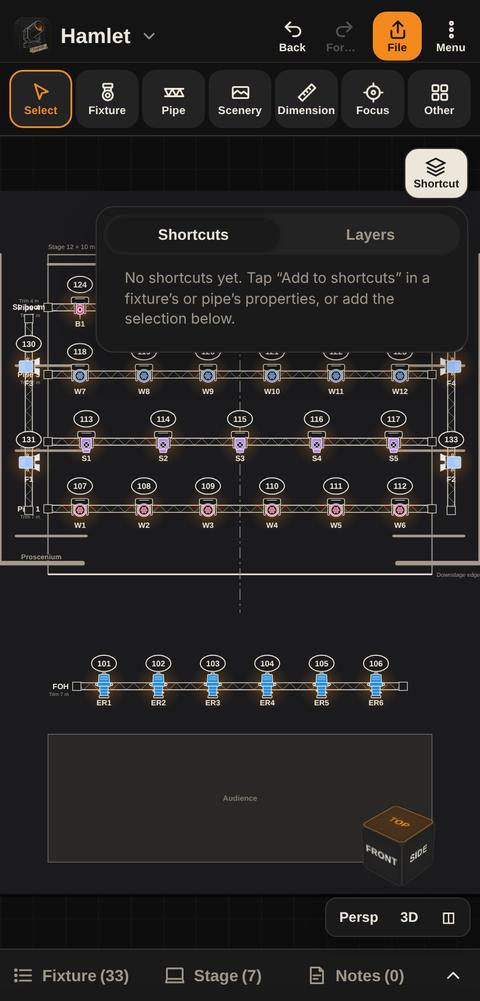
- Tap Layers top right of the drawing area. The eye hides / shows, the lock locks / unlocks.
- Layers: pipes and booms, fixtures, scenery and legs, performers, texts, dimensions, pipe dimension chain.
- Objects on a locked layer can’t be selected or moved. Hidden layers don’t show on screen or in PDF / PNG exports.
- Your own layers: select fixtures › Assign to layer › new layer (e.g. “Front light”, “Act 2”). Each can be hidden and locked; Select picks everything in it.
21 · Settings and backup
⋮ › Settings:
- Language: Türkçe / English. Theme: LampOff (dark with truss look), dark, light.
- Fixture symbols: real size or classic black and white.
- Clean screen: hides hints and view titles.
- Defaults: stage size and designer name for new projects.
- Backup / restore: all projects in one file.
22 · FAQ
- Where are my plots? In this device’s own storage. Back up important ones with Export › Save project (.json).
- I deleted something by mistake. Undo at the top.
- A fixture won’t snap onto the pipe. Drop it closer, or press and hold the pipe › Add fixtures. If the pipe is full it slides beside it; lengthen the pipe.
- I keep moving pipes by accident. Lock them (section 11) or lock the pipe layer in Layers.
- Lights are at the wrong height in 3D. Enter pipe heights, or drag the pipe up or down in the front view.
- Part of my plot is not to scale and the dimension looks wrong. Select it, check “Don’t use the real length” and type the value.
- The screen is too busy. Hide the bottom panel or zoom box in ⋮ › Layout, edit the toolbar, or build your own screen with My layout.
- How do updates arrive? On a phone, Google Play updates the app. The version is shown at the bottom of this window.
23 · Glossary: A to Z
- Address (DMX)
- The fixture’s start channel in its universe (1–512). Set in properties or the patch list.
- Auto patch
- Puts unaddressed DMX fixtures on free addresses in order.
- Beam
- The cone of light; aimed with the orange focus point.
- Bottom panel
- The Fixtures / Stage / Notes list at the bottom.
- Changed patch
- A dimmer / address that differs on site; a temporary note, red on the plot.
- Conflict
- Two fixtures whose DMX ranges overlap; red in the patch list. Dimmers also take a universe; a dimmer that lands on a moving or LED fixture’s address in the same universe is listed too (two dimmers on one circuit count as a shared feed).
- Console channel
- The fixture’s number on the console (Fixture ID / channel).
- Dimmer
- The channel a conventional fixture is plugged into.
- Done
- The confirm button at the bottom of the properties sheet; saves and closes.
- Export
- The orange button; PDF, PNG, CSV, MVR, console files and project backup.
- Focus mode
- Bar and box for focusing on stage; focused fixtures turn green.
- Front / side view
- Views from the audience and from the side; heights are edited here.
- Gel
- Lee / Rosco color filter code; goes into the gel cut list.
- Green
- Shows focused fixtures in green on the plot in focus mode.
- Haze
- Smoke density that makes beams visible in 3D.
- Layer
- A group of objects you can hide and lock together.
- Library
- Real fixture models with modes, channel maps, power and size.
- Lock mode
- While Lock / Unlock is on, everything you tap is locked / unlocked.
- Mirror
- Copies the selection to the other side of the centre line.
- Multi-select
- A tool that adds everything you tap to the selection.
- MVR
- The common scene file of consoles and visualisers.
- My layout
- Your own working screen made of floating boxes.
- Numbering
- A tool that numbers fixtures in the order you tap them.
- Patch list
- Channels and addresses of all fixtures.
- Perspective
- A drawing-style 3D view of the plot.
- Pipe (truss)
- What fixtures hang on; can have an angle and a height.
- Pipe array
- Builds several pipes at once from a count and spacing.
- Rider
- The technical document (PDF) with plot, equipment and lists.
- Selection bar
- Properties / Pipe / Duplicate / Focus / Delete / ⋯ More, shown when something is selected.
- Split screen (◫)
- Plot at the top, 3D or front view below, together.
- Stage templates
- Proscenium, black box, arena and more, built to your size.
- Trim (height)
- The pipe’s height above the floor.
- Universe
- A DMX line of 512 channels.
- Upright tower
- A truss standing up from the floor; a square on the plot, full height in the front view.
- Venue
- A saved theatre (stage, pipes, scenery); starts a new project ready.
- View cube
- The cube bottom right; tap a face to switch to that view.